Saturday, April 18, 2009

What are those buttons for?

After you purchase your Toyota Alphard, you will want to familiarize yourself with all the features available in the interior. Many owners may have a hard time trying to figure out what are all those buttons on the dashboard as well as on the center console since the manual are in Japanese. I will provide a brief description on those black buttons in this post.

Behind the steering wheel, on the right hand side of the dashboard there are five buttons.

Toyota Alphard Button on Right of Dashboard
Referring to the photo above, from left to right these buttons are the switches for:
  1. AC 100V switch - This button turn on the accessories power supply. Passenger at the middle row can then connect devices to the power outlet located behind the central console between the front seats.

  2. AFS OFF switch - For model fitted with AFS HID light, pressing this button will turn off AFS function

  3. Left Power Door switch - This button control the opening and closing of the left power door.

  4. Right Power Door switch - This button control the opening and the closing of the right power door

  5. Rear Fog Lamp switch - for model fitted with rear fog lamp (typically for location with winter season), this switch will turn on the rear fog lamp

On the left hand side of the dashboard behind the steering wheel, there are also five buttons.

Toyota Alphard Button on Left of Dashboard Refer to the photo, from top to bottom these buttons are the switches for:
  1. Power Door Off switch - When this button is pressed, the power door will not be activated. This is to prevent rear passenger to open the power door

  2. Power Boot switch - This button open and closes the power boot for car fitted with Power Boot

  3. H-TEMS switch - This button allow you to switch the adjustable absorbers into one of the 3 mode - Normal, Sport (S) and Comfort (C ). This button is only available on model equipped with adjustable suspension

  4. Lane Monitoring Switch - This button turn on/off the lane monitoring system.

  5. TRC Off switch - When this button is pressed, traction control will be turned off. This button is only available on model equipped with TRC feature.

On top of the center console, there are also 5 buttons.

Toyota Alphard Button on Center Console
From left to right, these button are the switches for:

  1. Passenger seat heater switch - This button turn on/off the heater under the passenger seat. This button is only available on model equipped with heater feature such as a MZG model
  2. Driver seat heater switch - This button turn on/off the heater under the driver seat. This button is only available on model equipped with heater feature such as a MZG model
  3. Backdoor curtain switch - This button open/close the curtain mounted at the boot
  4. Side curtain switch - This button open/close the side curtain on both side of the car
  5. Rear sunroof switch - This button open and closes the rear sunroof

Hope this help.

Sunday, April 12, 2009

Front and Rear Cameras In Your Toyota Alphard

One of the most important feature in the Toyota Alphard is the front and rear camera.

Driving such a big car on the road or in the car park required you to be able to see the surrounding. Without the cameras, you'll have to "judge" the distance of the objects around your car as you maneuver it. Imagine when you have to reverse park, you have to get down from the car to see how far you are from the objects behind you (it could be another car, a pole or the wall) which is very inconvenient. With the camera installed at the front/rear of your giant, you can instantly see the distance of the object from HU display without the need to get down.

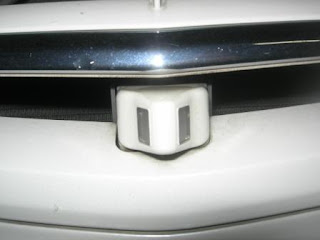
The front camera is mounted at the lower edge of the center of the front grille.

Toyota Alphard Front Camera - 2 views
Depending on the year of manufacture, you may have a two-sides view model or three-sides view front camera (the Toyota manual called it the BlindCorner option). If it is a two-sides view camera, you will see both sides of the front section of your car as shown below

Toyota Alphard Front Camera View
If it is a three-sides view camera, you will see the left and right of the front edge of the car and also the front section directly in front of your front bumper (as shown in the photo below)

Toyota Alphard Front Camera - 3 views
The front camera view is normally displayed on the HU the moment you switch on your car. You can turn if off by pressing the camera button on the steering wheel.
Toyota Alphard Front Camera Button
Most Alphard owners will normally leave the front camera view on the HU during their normal driving. The camera view will be turned off once the car started moving and it will also be automatically turn on again once the car come to a standstill.

For the three-sides view camera in the NFL model, there is an button on the HU to change the view from two-sides to three-sides or vice versa (see the circled button in the photo below). I have not seen such button on the pre-facelift model.

Toyota Alphard Change View Button
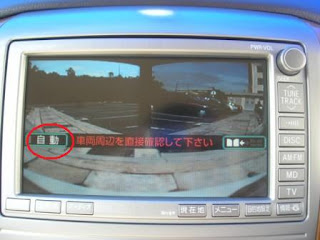
Also, on the NFL model, if you find it distracting, there is also a "auto" button labelled ”自動" that you "touched" (remember this is a touch screen LCD) on the HU to turn off the camera view when you start the car.

Toyota Alphard Auto Button
You can turn on the camera display manually by pressing the camera button on the steering wheel. I like to leave the camera off when I am driving and then only turn it on when I need it during parking.

The rear camera is mounted on the rear boot just above number plate. The rear camera view will only automatically turn on when you shift the gear lever to the reverse position. On the rear camera view, it show the maximum distance that your car can reverse in the form of a yellow rectangle and the extreme position in red line (see photo below)

Toyota Alphard Rear Camera View
When you start to turn your steering, the yellow line will move in the direction where you are turning to while a green line will appear to show where your car original position is relative to the current turning position (see photo below).

Toyota Alphard Rear View Turning
The middle yellow line is about 1 meter from the rear of the car while the red line is about 0.5 meter from the rear of the car. The white curve line at the bottom of the screen is the bumper edge.

You can maneuver your car into a parking lot using the yellow line for the turning angle, the green line as the guide to the parking lot position and the red line as the maximum distance you can move before you hit any object. Once you shift the gear lever out of the reverse position, the reverse camera view on the HU will be turn off automatically. Also, after the reverse camera view is turned on and you press any other buttons on the HU, the reverse camera display will be turn off automatically. Hence you'll need to shift the gear lever again into reserve position to see the rear camera view.

Typically, you will use both the camera views in conjunction with the sonar sensor to give you the confidence level on how safe to move close to the front or to reverse. Sonar sensor is not a standard option on the lower model so you'll need to check if the unit you are looking for come fitted with one.

The sonar sensor is shown in the photo below.

Toyota Alphard Sonar Sensor
The four dots on each corner of the car will be lighted when the sonar sensor detected the car is too close to an object.

When you car get too close to an object, the sonar sensor will start to beep, the green dot of the corner which is close to that object will flash slowly in red now and a yellow icon will be lid on the HU showing which corner of your car is too close to that object. If you continue to move even closer to that object, the yellow icon will turn into red while the sonar's red dot will now flash continously. Please take caution when the red light flashes on as it mean you are too close to that object. Any further movement you make and your car may hit that object.

Once the red dot on the sonar sensor is lighted previously, the next time you switch on your engine, it will continue to light up again until you move your car away from that object to a safe distance. Therefore do not be alarmed when you hear a continuous beep and the red light flashing when you next switch on your car!

Friday, April 10, 2009

Pre-Facelift and New Facelift?

In my last post, I show you how to determine the year of manufacture on the unit you are interested in. I also mentioned that from May 2005 onward, the Toyota Alphard receive a minor face lift. In this post, I will show you how to differentiate a pre-facelift unit from a new facelift unit.

Exterior

On the exterior, there are some changes in the head light cluster at the front and at the rear.

In the photo below, it show side-by-side the front head light cluster of a pre-facelift (left photo) and new facelift model (right photo).


Toyota Alphard Front Light Cluster
The new facelift front light cluster has two extruding white lip at the side. The pre-facelift light cluster has an orange signal light at the back portion of the light cluster while the new facelift has clear glass at the back. If you view from the side, you'll see the different as shown below.

Toyota Alphard Light Cluster Side View
Since the front light cluster is different in size, the front grille size is also different but it is not easy to see through the naked eye. The easiest way to identity the different is that the new facelift top grille is thicker as shown in the right photo below.

Toyota Alphard Front Grille
Anyway one should not use the grille as the absolute way to differential the model because the previous owner might have change to after market grille.

At the rear, there are changes on the appearance of the signal light cover and the reverse light cover.

The new facelift rear signal light cover has two white strips (right photo) while the pre-facelift has only one large strip (left photo).

Toyota Alphard Rear Light Cluster
The pre-facelift reverse light cover is smaller (left photo) while the new facelift model (right photo) has a larger cover with distinct round shape internal light element.

Toyota Alphard Reverse Light
Interior

The major change in the interior is the head unit. In the photo below, the left photo shows the new facelift unit has an 8-inch head unit while the pre-facelift unit has smaller head unit.

Toyota Alphard Head Unit
Since the new facelift model come out in May 2005, by looking on all the features at the exterior mentioned above, you can be certain that a it is a NFL unit.

Is it possible to upgrade a pre-facelift unit to a new facelift look? The answer is a resounding YES. However, the cost is also very high because the entire front light clusters, the grille and the side panels has to be changed. At the rear, the entire rear light cluster and the center panel also needs to be changed. Last I heard it will cost RM8K upward for the facelift to be done locally.

Even if the owner has change the exterior from pre-facelift to new facelift, the interior such as the head unit cannot be easily change. The wiring harness from the pre-facelift model cannot be fitted into the new facelift hear unit. I have seen cases where the dealer posted the ad for a NFL unit but then the interior clearly shows that it is a pre-facelift model.

My next post will go cover the front and rear camera operation.

How To Determine The Year of Manufacturing of Your Toyota Alphard

So you have taken the first step and walked into the dealer premises. Looking at all the units on display and the price tag which state the year and the price, how do you tell which year is that unit manufactured in?

Over here, the Toyota Alphard is not available as a new car from the official Toyota distributor. Almost all unit available for sale here are fully imported used car. By that I mean the car has been registered and used in Japan. The owner than sold the car to a used car dealer who in turn sell it oversea. The parallel importer will import these cars into our market and distribute these cars to the local used car dealers.

The used car dealer will normally advistise these car as "unregistered" unit and sell at the premium they set. Different dealer will sell these cars differently depending on the year of manufacture of the car. Some will offer to display all the details of the car together with the price while other will tend to hide some of the details and try to sell the car at a higher price from what it really worth.

So what can a potential buyer do to find out what year is that unit manufactured in?

1. Check out the chassis number of the car to ensure that the year of manufacture of the car is what the dealer claim to be.

If the car is a pre-facelifted model, look for the chassis number at the left side of the car bulk head and copy it down. Look at the photo below for the location of the chassis number on pre-facelifted model.

Toyota Alphard PFL Chassis Number
If the unit is a new facelifted model (NFL), it is hidden behind the engine bulkhead. You'll have to open the plastic cover as shown in the photo below (the red square I marked) and look inside. You'll may need a torchlight to see the chassis number if it is rather dark.

Toyota Alphard NFL Chassis Number Once you have copied the chassis number, input the chassis number into the input box on this page:

http://www.japan-partner.com/check-manufacture-year.php

and it will tell you which year this car is manufactured? This is the first step to verify that the car is manufactured in that year. I have tried a few chassis numbers including mine and it is proven to be very accurate.

2. Check out the seat belt label attached to any of the seat belt. It usually state the year this car is assembled. Look for a label as shown in the photo below and check out the year.

Toyota Alphard Seat Belt Label
However a lot of dealer has the practice of cutting off the label so you might not find it anymore in the unit you look at so you have to go for the 3rd option. If the label is cut, then you'll have to exercise caution and should at least follow step 1 above.

3. If you can't find the seat belt label and don't have the means to check the chassis number on the spot, the next option is to look at the toolbox cover. At the left side of the boot, there is a plastic toolbox cover. See this photo for the location of the toolbox cover.

Toyota Alphard Toolbox Cover
Remove that toolbox cover, flip it over you will find some dots in a table layout. The left column shows the year, the top row shows the month while the dots in the cell shows the week. Therefore you can tell from the imprint which week in which month in which year that it is manufactured. In the photo below, it shows that this unit is manufactured on the 1st week of July 2005.

Toyota Alphard Manufacture Info
During my search for my giant, I realized a lot of dealers doesn't know about this little "secret" until I show it to them. Do realized that some unscrupulous dealer might swap the toolbox cover (very rare since they are also not aware of this fact) so do check out item 1 and 2 first before you rely on the toolbox cover for the age of the car.

If you cannot use any of the option above to ascertain the year of the car, my advise is to walk away, and find another unit that does.

So far my experience tell me that the chassis number is the best way to verify the year of the car. If you can verify the year on the seat belt it is also very accurate. The toolbox cover date is also very accurate unless the dealer did a swap.

Why it is important to ascertain the year of the car?

Due to the way Approve Permit (AP) work in this country, imported cars cannot exceed 5 years from the date of manufacture. For example, any car imported this year (2009) must be at least manufactured in 2004 and above. Because some cars maybe manufactured in end 2003 and registered in 2004 in Japan. When it is sold oversea, the dealer using the AP will have to pay the duty for year 2004 and yet the car will have the year 2003 printed everywhere. So effectively you might be paying the price of a year 2004 car when in reality it is a year 2003 car.

I have actually seen several units that is manufactured in 2002 but sold as 2004 model by one dealer. Buyer of these cars will lose out on the second hand value when they want to let go of their car in future.

In the next blog, I will briefly cover how to identify a pre-facelifted and facelifted model.

Edit: I have also since found out that on NFL model, the chassis number is also printed on a face-plate on the left column of the passenger door. Below is a faceplate of the chassis number on a NFL model. The chassis number is the alphanumeral starting with ANH10 (MNH10 for 3.0L model). It also shows the engine variant (2AZ-FE) which is a 2.4L model, with U241E transmission and 2-wheel drive (02A). The colour of the car is white (042), trim (FB03) and manufactured in plant C32. I hope to find out more about the trim number.

Toyota Alphard Chassis Label

Thursday, April 9, 2009

Learn More About Toyota Alphard

Before I write more on the features available on my giant, I do get a few private queries from interested buyers on where can they get more information about this car, specifically from local used car dealer.

Since Toyota Alphard is a product of the Land of the Rising Sun, almost all information on this car is in Japanese. Most non-Japanese speaker will find it hard to extract the relevant information from the Toyota official website. Also, most enthusiasts of this car in Japan will be blogging about their beloved giant in (naturally) Japanese so a non-Japanese speaking reader will find it hard to understand what has been blogged.

So where do one find out more about this car if they are interested to buy one unit?

A typical buyer would like to start with the official Toyota Japan website. However it is in Japanese and even if you do read Japanese, they only publish information about the current model (May 2008, aka 2nd generation Alphard). As of the writing of this blog, most of the Toyota Alphard we get in here are year 2007 or below. Fortunately the official Toyota website do kept the catalogs of the 1st generation Alphard.

I managed to find these catalogs during one of my search on that website and you car get them from the links below.

Alphard-G
Pre-facelift - manufactured 2003/7 onward - http://web-cache.stream.ne.jp/www09/toyota-catalog/pdf/alphardg-1/alphardg-1_200307.pdf
Minor facelift - manufactured 2005/5 onward- http://web-cache.stream.ne.jp/www09/toyota-catalog/pdf/alphardg-1/alphardg-1_200504.pdf
NFL model - manufactured 2007/6 onward - http://web-cache.stream.ne.jp/www09/toyota-catalog/pdf/alphardg-1/alphardg-1_200706.pdf

Alphard-V
Pre-facelift - manufactured 2003/7 onward - http://web-cache.stream.ne.jp/www09/toyota-catalog/pdf/alphardv-1/alphardv-1_200307.pdf
Minor facelift - manufactureed 2005/5 onward- http://web-cache.stream.ne.jp/www09/toyota-catalog/pdf/alphardv-1/alphardv-1_200504.pdf
NFL model - manufactured 2007/6 onward - http://web-cache.stream.ne.jp/www09/toyota-catalog/pdf/alphardv-1/alphardv-1_200706.pdf

Note: I intend to blog about the difference between the G and V model in future post.

By downloading these catalogs, you can compare the various features between the pre-facelifted and facelifted model. Again, these catalogs are all in Japanese so you might not understands all the wordings. However, they do have a lot of pictures that highlights most of the important features.

Now that you have an understanding what features are available in which model, you want to know which dealers carry these cars. There are several local sources of advertisement for these cars. The most popular one is The Star Classified section of The Star Newspaper. The other is the weekly Motor Trader magazine. Both also has the equivalent online version of the classified ad. I prefer to use The Star Classified online because it is much easier to search than the online version of the Motor Trader . The advantage of the Motor Trader online search that you can do more granular search (by year etc) and each of the ad normally comes with a photo of the car.

So you took down the details of the ad and visited the dealer on the model you are interested in. After you check out the car, test drive it, you brought home some further details of the cars you are interested in but you wanted a 2nd opinion. You start to look for online forum wanting to post your questions but you are not sure which forum to post because there are hardly any forums on Alphard at that time.

As of the end of last year, this car is heavily discussed in the Motor Trader forum. They have a section dedicated to discussion on Toyota MPV . Prior to end of last year, most of the enthusiasts or owners of this car will gathered at that forum. Topics on Toyota Alphard is very active so there is lot to learn from some of the more experienced owners/enthusiasts. However since that forum is on Toyota MPVs many other threads on other Toyota model will also be discussed so one has to constantly follow the Alphard thread to read the up-to-date discussions. Also, once a thread has gone beyond certain (I think 24/25) pages, a new thread will be created so it is not easy to keep track of the active topics. Fortunately the old threads are archived so whoever new to the topic can always refer to the archived thread. You can still post your questions to that forum but most of the active Alphard members have already move on to another forum so your questions might not be answered. The other issue with the Motor Trader forum is that it doesn't support photo attachment.

I used to frequent that forum and learn a lot from there. Toward the end of last years, a bunch of very active members decided to create a dedicated forum for Alphard. Through the initiative of one of the member, a group of Alphard owners from KL as well as some owners from JB come up to KL during the 1st week of Jan'09 to have a mini TT (TT stands for Teh Tarik - the unofficial slang for group gathering, drinking tea [the the teh tarik part] while chit-chatting). After that mini-TT, the group decided to create a dedicated forum for Malaysia Alphard owners. Through the generosity of one of the forum member who hosted a website, the forum called "Alphard Asia Owner Club" (AOC) was born. A lot of the Alphard owners/enthusiasts who used to frequent the Motor Trader Toyota MPV forum now have moved over to AOC forum. I now frequent that forum to share what I have learned so far about my giant.

If anyone is interested to learn more about Alphard, do visit AOC, registered as a member and joined in the discussions. You don't have to own an Alphard to be a member.

Hopefully after you join AOC and gotten all your answers you can made your final decision and become an Alphard owner. Congratulation and welcome to the club.

Wednesday, April 8, 2009

What features are in my giant - Toyota Alphard?

Let have a look at some of the features that come with my giant (Toyota Alphard).

The twin power door is an very important features because it provide the flexibility for the passenger to get in or come out in whichever side that is convenient. Here is a rear view when both power doors are opened.


Toyota Alphard Rear View
Also with the power doors, the opening and closing of both doors can be controlled by the drivers. Similarly the power doors can be controlled via the remote buttons on the master car key. This feature is very handy whenever I go out with my wife. She doesn't like the hot sun and before we get into the car, I would have already open the door for her to get in. Yes, she like to sit in the middle row seats because she can move about (whichever direction the sunlight come, she can always move to the other side!)

If you couldn't find a unit with twin power door and decided to take one with a single power door, do note that the cost to retrofit the other vacuum door with the power door is quite expensive. Last I heard it will cost upward to RM7K. Take your time to find one unit with twin power door if you think your really need it.

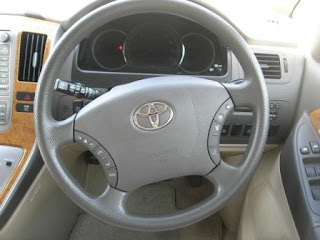
This is the view of the steering wheel and tachometer from the driver side.

Toyota Alphard Dashboard View
You'll noticed that on the steering wheel, there are a few buttons on both sides.

Let start with the right hand side. The top two button on the right side are used to control the telephone function. The top button will disconnect the phone while the 2nd button below is used to receive incoming phone calls. One of the reason I have chosen the NFL model is because it comes with Bluetooth function. With this feature, the moment I step into the car, the built-in Bluetooth unit will automatically establish connection with my mobile phone. Whenever a call comes in, I just have to press the receive button (the 2nd button) on the steering and I will be able to speak to the caller and listen to the phone conversation via the car speakers, without having to press any key on that phone.

The 3rd button is the front camera button. Because the car is tall and you sit up high, it is not easy to gauge the distant to the front of the car when you are driving or parking. Pressing the front camera button will turn on the camera view on the head unit and you can see how close you are to the object in front of the car. The front camera view will only come on the head unit when the car is either stationary or it is moving below 10km/h.

Now to the left hand side. The lowest button on the left of the steering wheel is the mode button. It allow you change the operating mode of the head unit from radio to DVD player, MD player, HDD media player or GPS function (which is not operational in this country). The top 2 buttons on the left of the steering wheel is used to control the volume of the head unit. The next two buttons below that are used to change the channel/selection depending on which mode the head unit is operating on.

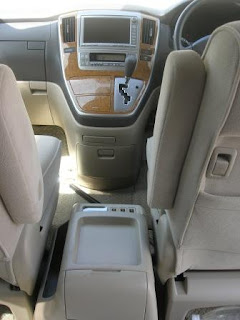
This is a view of the center console from the middle seats.

Toyota Alphard Center Console
And this is a close up view of the center console

Toyota Alphard Console Closeup View
The head unit in the center console has an 8-inch LCD display. This is a standard fitting on the NFL model. Older model would have a head unit with smaller screen. This is also one of the reason why I choose NFL model over the older model. This head unit has more functions than the head unit from the older model. Specifically it support DVD, MD, GPS, Bluetooth and front/back camera. In future posts I will share more on these features.

Below the LCD display are the air conditioner control buttons. These buttons allow you to control the front and rear outlets of the air conditioning. To control the rear outlets, you'll have to first push the "Rear" button on the left side of the airconditioner control buttons panel.

On the left handside of the clock display, there is a rectangle shape of a car with 4 dots at each corner. That is the sonar sensor/indicator. The sonar sensor button is directly below that rectangle shape (the left most black button) is used to activate the sonar sensor. In this post, I covered the sonar sensor functionality briefly.

If you look closely at the gear shift, you'll notice that this car is still a 4-speeds model. A lot of people has the misconception that all NFL model comes with 5-speed gearbox. Only the 3.0L NFL model comes with 5-speeds gearbox. The 2.4L NFL maintain the 4-speeds gearbox as in previous model.

On the passenger side, there is a two-layer glove box as shown below.

Toyota Alphard Glove BoxIn some model such as those with 5.1 theatre sound system, the DVD player is installed in the upper glove box.

This is the view from the rear seat looking up at the roof.


On the top are the control buttons for the rear air conditioning outlets. The rear passengers can control the air conditioning independent of those at the front. There are 4 separate outlet for air conditioning on each side for both the middle and rear row passengers (actually there are more but I won't go into each location).

Further upfront is the 9-inch roof-mounted LCD. This is not a standard option for an AX-L model. The previous owner in Japan has chosen this as an installable item when he purchase this car. If your model don't have a roof-mounted LCD, you can retrofit it locally but it is going to cost quite a bit.

The roof-mounted LCD has it own remote control unit so that the rear passenger can control the head unit as well as the LCD display. This is how the remote control unit look like.

Toyota Alphard LCD Remote
I will cover in another post on the sliding seats function.

My Giant - A Toyota Alphard

Now would be a good time to introduce my giant (a Toyota Alphard).

Mine is a 2.4litre 2005 NFL Alphard V model. It is a 8 seaters with 2 power doors, original head unit with front and rear camera, bluetooth function, roof mounted LCD, front and rear sonar sensors, and multi-function steering.

This is front view of my giant.
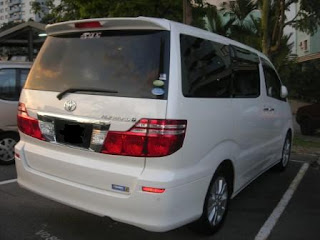
Toyota Alphard Front View A view from the rear
Toyota Alphard Rear View This is called an AX-L model, which doesn't has any body kit, standard 16-inch rims and the tail pipe is small and not visible from far.

I have choosen the pearl white colour unit because it brings out all the lines of this boxy car.


An AX-L a high spec model in the AX model range for Toyota Alphard. The standard AX typically comes with single power door on the passenger side while the driver side will have vacuum door. Also typically a AX-L will have multi-function steering while an AX comes without. Mine also comes with a roof-mouted LCD which is typically not available on AX.
Here is a view of the middle row seats. Notice the large space in between the middle rows and the front seats
Toyota Alphard Middle Seats We have choosen fabric seats because my wife cannot stands leather smell. I like the beige colour because it make the whole car looks neat and clean, although it is not easy to maintain.

Here is a view from the rear with the boot opened.
Toyota Alphard Cabin Space
The car is still in stock form since I owned it and the only modification I did was changing the stock 16-inch rims to 17-inch rims. Here is a before and after image of the rims.

Toyota Alphard Rims
In future blogs, I am going to cover more details of the features in this giant.

Updates: I have since change my rim back to 16-inch stock set up as shown on the above photo on the left. I also swapped in a new set of Goodyear LS2000 Hybrid II tyres imported from Japan.

Beginning Of The Eight Seater Story - A Toyota Alphard

When I started looking for a car to replace my previous ride, I wasn't thinking of driving a giant on the road everyday.

My previous ride is an SUV and in this part of the world it size is consider quite big on our road. I have got used to it size so when I am looking at replacing the car, I was thinking of something slighly larger but not the largest at that time. That SUV served me well for 3 years and as many owners of this brand of car quite rightly said, it will start to break down after 3 years. Mine really start to act up after 3 1/2 years of owning it so I started to look for a replacement.

My initial plan is to look for an MPV which is slightly larger in size than my SUV. I already got used to sitting high up with the SUV so driving the MPV is not an issue for me. My brother-in-law own an MPV and it 7-seaters arrangement come in handy as it can carry as many family members whenever we go out. However, the 2 individual seater arrangement in the middle row of that MPV gave away one seat so when I started looking at mine, my first criteria is that it must be an 8 seaters (in 2-3-3 arrangement). At least when I need it I can carry one more passenger since the middle row of a 8-seater is a bench seat arrangement (actually 60/40 split of two seats). With that in mind, I started going out to the used car dealers yard looking for the car.

My original plan is to get an Estima as it has that aerodynamic look from the front. Also, the price range of the Estima fits my budget. I went to almost every dealer in the surrouding of KL hunting for one that has the specifications I needed. 8 seaters, two power doors, sunroof/moonroof, head unit with reverse camera function. Well after looking at many units, I couldn't find one that either fit my specifications or the price is not right. I wasn't even thinking about it bigger-size brother at all.

One day we drop by in one of the dealer and saw several units of Toyota Alphard with almost all the specifications I wanted. My wife and I also test drove the cars and we start to change our mind. Both of us is debating whether we really need such a big car for just the two of us. I reasoned that when we need the space, the Alphard can carry as many of our family members when we need it. We actually went back to the dealer 3 times to look at that car, negotiated the price and then only on the 3rd visit, we signed on the dotted line! In fact the dealer make the deal sweeter for us by offering us a reduction in the price voluntarily on the last day.

As we walk out of the dealer premise, we are still asking ourself do we really want to drive such a big car everyday?

Well, that was 3 months ago and today I am actually driving this giant on the road almost every day. My wife has a choice of 7 seats to choose from whenever we go out.

And this is the beginning of the eight seaters story.

Wednesday, April 1, 2009

Index of All How To Pages

This index lists all the informational and howto pages that help with the ownership experience of Toyota Alphard owners.

General

1. How to learn more about your giant? Click Here

2. How to determine the year of manufacture of your giant? Click Here

3. How to know if your giant is a pref-facelift (PFL) or new-facelift (NFL) model? Click Here

4. Learn what are all the buttons in your giant. Click Here

5. How to differentiate between a G and V model? Click Here

6. Model Code for 1st Generation Toyota Alphard? Click Here

7. Model Code for 2nd Generation Toyota Alpharrd? Click Here

8. How many grade of Toyota Alphard are there? Click Here

9. What are the body colour available for the 1st Generation Toyota Alphard? Click Here

10. How to tell if it is a 2WD or 4WD model 1st Generation Toyota Alphard? Click Here


Operation

1. How to operate your front and rear cameras? Click Here

2. How to operate the head unit (NFL)? Click Here

3. How to operate the radio function in the head unit? Click Here

4. How to operate the CD player in the head unit? Click Here

5. How to operate the DVD player in the head unit? Click Here

6. How to operate the HDD function in the head unit? Click Here

7. How to operate the Bluetooth function in the head unit? Click Here

8. How to set up the Phone Book in the head unit? Click Here

9. How to operate the Hands-free function in the head unit? Click Here

10. How to configure other options in the head unit? Click Here

11. How to set up the maintenance reminder in the head unit? Click Here

12. How to initialize the content in the HDD in the head unit (NFL)? Click Here

13. How to delete a track or playlist from the HDD in the head unit (NFL)? Click Here

14. How to program the door auto-lock and unlock? Click Here


Maintenance

1. How to replace the air con filter element? Click Here

2. How to replace the air filter element? Click Here

3. Location of fuses in your Toyota Alphard? Click Here


Ownership

1. What options should you choose for your Toyota Alphard? Click Here

2. Why full specs model is rare? Click Here

3. Learn more before you buy that unit? Click Here

4. Looking for English owner manual? Click Here

5. Retrofit doesn't not equal original? Click Here


Updated: Jan 14, 2010