I lost access to the Internet for couple of days as my PC “died”. It started with the Vista operating system partition extremely fragmented causing excessive disk activities.
When I try to defrag the Master File Table and the partition using the so called boot-time defragmentation the defrag software somehow go haywire. When the system rebooted it complained that the windows loader was missing. Yeah big time mistake.
I had another partition running Windows 7 so I booted it up and it “senses” that my Vista partition is corrupted and tried to recover all the orphaned files. During the recovery the PC suddenly shut down by itself.
Pressing the power button doesn’t power the system anymore. Initially I thought it was the power supply unit so I took it out and indeed it has some burn smell emitting from the power supply unit.
Since it comes with 5 years warranty so that’s good and I took it back to the computer store when I bought it. Unfortunately the warranty claim cannot be processed immediately as they have to send the unit back to the dealer to get a replacement. This whole process will take one month!
So I bought another power supply unit and upon fitted it the PC still doesn’t want to power up. Another hour of investigation and I finally found the culprit. It was the new graphic cards that I bought a month ago. The moment I removed the graphic card from the motherboard, the PC immediately power up.
Again I took the graphic card back to the computer store and initiated a warranty claim. As expected the same one month waiting period apply.
If you have assembled your own PC lately than you would know that the latest motherboard from Asus/Gigabytes doesn’t come with any onboard graphic adapter. Without a graphic card, you will not be able to connect the monitor to your PC. I can either wait for a month for the warranty claim to be processed or my PC remained non functional during this period.
So I bought another graphic card (ouch) and reassembled the PC. Now I am back online and but still sore with the warranty system for computer parts in this part of the world. Apparently they favoured the seller rather than the buyer.
Their current practice is that if you return the part within 7 days, they will give you a one-to-one replacement on the spot. If you come back after 7 days, then they put the liability back to the dealer. Some even charge your some small amount for the delivery fees to send the part back and forth from the dealer.
This is the standard practice for most of the computer parts dealer in Low Yat Plaza. The main the reason they do this is to reduce their risk of carrying too much inventory just to cater for warranty claim. Given that some components like motherboard and high end graphic cards carry a 3 year warranty nowadays. They don’t want to keep stock for that long so they put this responsibility squarely back to the dealer.
My reading of the many posts in computer forums that the warranty claims in other places like the United State is much fairer. Most warranty claim will be processed within a week and the owner can get their PC up and running again. Over here we are at the mercy of the computer parts dealers and will have to fork out money upfront to fix our computer.
This reminded me that when I bought my giant, I only have one month warranty from my dealer. Luckily my giant was in good shape so I don’t have to make any claim from the dealer. I understand that some dealer gave longer warranty period but I think at least they will honour the warranty claim.
The most the owner will have to do is to leave the car for a day or two and then you are back on the road again. In fact I would imagine that the warranty costs for any fault parts on the giant will be much more expensive than those computer parts. Well I think the warranty claim for our giant is fairer than the computer parts!
Tuesday, December 22, 2009
Thursday, December 17, 2009
Retrofit Doesn't Equal Original
I received several queries from my reader what are their options if the giant that they are looking at don’t have some of the minimum features I mentioned in this post.
I thought it would be a straight forward job to retrofit the missing features but I was wrong. Yes some of these features can be retrofitted locally but then it wouldn’t be the same like the original. I checked with my regular installer and it seems they are also providing the alternative solution meaning they can’t do the retrofit like those that come originally with the car.
For example if the giant that you are looking at don’t have the front camera, you can retrofit the front camera but then the installer cannot retrofit the front camera button onto the steering wheel for you. They will provide an alternative button somewhere at the dashboard in front of the steering wheel.
Similarly the installer that I frequent doesn’t have the know-how to retrofit the hands-free button onto the steering wheel. Therefore if a buyer wants to retrofit the Bluetooth function into the NFL model, he/she will have to find someone who is familiar with the wiring of the giant to do the retrofit. I have not come across anyone who can do this yet. One of my readers was quoted RM5K just to retrofit the Bluetoth function. I suspect the cost is so high because instead of retrofitting the button the installer is changing the whole steering wheel with one that comes with the button.
Another reader also highlighted that he is worried about the quality of the power door that is retrofitted locally. I don’t have experience on this but I think the worry is genuine. My understanding from my regular installer is that the retrofitting kit is fully imported from Japan. However I am not sure of the quality of the installation.
I have seen quite a lot of earlier batch giant from circa 2002-2003 doesn’t comes with any power doors. Also many dealers would like to entice their buyer with model that have twin power doors. They may retrofit the unit that don’t come the power door at the driver side to make it a twin power door model. Therefore retrofitting power door is a niche market and I believed if the installer has done enough of installation job they will get it right.
I know it is getting harder to find a unit that has all the features that you are looking for and you may be looking at the retrofitting route. As long as you have no issue with the result there are installers who can do the retrofitting job for you.
Friday, December 11, 2009
Location of Fuses in Toyota Alphard
In previous post, I mentioned that one of the ways to check for problem with power door is to look at the fuse. Where are all the fuses located in our giant?
There are several fuse boxes installed in a Toyota Alphard. The main fuse boxes are located in the engine compartment. The location of the fuse boxes in the engine compartment is slight different between the 2.4L and 3.0L model. On the 2.4L 2AZ-FE engine model, it is located on the right side of the engine compartment as shown in the photo below.
 On the 3.0L 1MZ-FE model, it is located in the middle section on top of the engine.
There is another smaller fuse box below the larger one as shown in the photo below.
This is for the 2.4L model. The 3.0L model has the same smaller fuse box in front of the radiator.
There are two more fuse boxes located under the dashboard, one is on the driver side as shown in the photo below.

You will have to unhook the smaller coin box from the dashboard before you can have access to the fuse location which is located deep inside the dashboard.
The other is located behind the glovebox at the passenger side.

Again you will have to unhook the lower glovebook before you can access to the fuses located next to the aircon filter box.
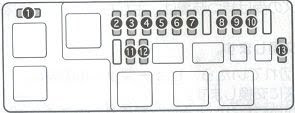
Now that you have located each of the fuse boxes, you’ll need to identify each of the fuses within the fuse box to ascertain which one controls which component. The following tables show the fuel name, the ampere and the description of each fuse. The diagrams before each table list the location of the fuses within the fuse box.
Main fuse box (in engine compartment)
Secondary fuse box (in engine compartment)

Fuse Box at driver side

Fuse Box at Passenger Side
Please note that the above write up cover what I know on the fuse locations for the new facelift model of 1st generation Toyota Alphard. Other model may have different fuse locations.
PS. Phew. This is the longest time I ever took to write a post because the formatting I have do for the table HTML code outside of the blogging platform.
PPS. A reader was asking where exactly is the fuse box on the passenger side. I am away at the moment so I can only attached a schematic diagram as a reference. I will take a better picture of it location when I am back.

There are several fuse boxes installed in a Toyota Alphard. The main fuse boxes are located in the engine compartment. The location of the fuse boxes in the engine compartment is slight different between the 2.4L and 3.0L model. On the 2.4L 2AZ-FE engine model, it is located on the right side of the engine compartment as shown in the photo below.
 On the 3.0L 1MZ-FE model, it is located in the middle section on top of the engine.
There is another smaller fuse box below the larger one as shown in the photo below.

This is for the 2.4L model. The 3.0L model has the same smaller fuse box in front of the radiator.
There are two more fuse boxes located under the dashboard, one is on the driver side as shown in the photo below.

You will have to unhook the smaller coin box from the dashboard before you can have access to the fuse location which is located deep inside the dashboard.
The other is located behind the glovebox at the passenger side.

Again you will have to unhook the lower glovebook before you can access to the fuses located next to the aircon filter box.
Now that you have located each of the fuse boxes, you’ll need to identify each of the fuses within the fuse box to ascertain which one controls which component. The following tables show the fuel name, the ampere and the description of each fuse. The diagrams before each table list the location of the fuses within the fuse box.
Main fuse box (in engine compartment)

| Fuse Name | Ampere | Description | |
| 1 | SLC | 7.5A | VSC |
| 2 | H-LP (RH) | 15A | Headlamp high beam (RH) |
| 3 | H-LP (LH) | 15A | Headlamp high beam (LH) |
| 4 | H-LP (RL) | 15A | Headlamp (RH) |
| 5 | H-LP (LL) | 15A | Headlamp (LH) |
| 6 | RAD NO.3 | 25A | Audio |
| 7 | HAZ-HORN | 20A | Hazard Light, Indicator Lights, Horn |
| 8 | EFI | 15A | Engine Computer |
| 9 | RAD NO.1 | 15A | Audio |
| 10 | ECU-B | 10A | Meter, ABS, Power Window |
| 11 | SPARE | 15A | Spare fuse |
| 12 | SPARE | 7.5A | Spare fuse |
| 13 | ETCS | 10A | Electronic Toll Collection System |
Secondary fuse box (in engine compartment)

| Fuse Name | Ampere | Description | |
| 1 | ABS | 25A | ABS |
| 2 | ALT-S | 5A | Alternator |
| 3 | DOOR NO.1 | 30A | Door Lock |
Fuse Box at driver side

| Fuse Name | Ampere | Description | |
| 1 | STOP | 15A | Ingition Light |
| 2 | GAUGE | 10A | Engine Computer, Power Slide Door, Clearing Sonar & Park Sonar |
| 3 | CURTAIN- RH | 15A | Electric Curtain - Right Hand Side |
| 4 | CURTAIN LH& BK | 25A | Electric Curtain - Left Hand Side and Rear |
| 5 | MIR HTR | 10A | Mirror Heater |
| 6 | CURTAIN | 5A | Electric Curtain |
| 7 | WIP | 25A | Wiper |
| 8 | AC 100V | 15A | Accessory Console Center |
| 9 | P/W RH | 25A | Power Window |
| 10 | ODB-II | 7.5A | Dignostic Connector |
Fuse Box at Passenger Side

| Fuse Name | Ampere | Description | |
| 1 | S/ROOF | 30A | Moon-roof |
| 2 | DEF | 30A | Rear window defrost |
| 3 | FOG | 15A | Front Fog Light |
| 4 | DOME2 | 7.5A | Room Lights |
| 5 | VSC | 7.5A | VSC |
| 6 | P/SEAT | 30A | Power Seats (3.0L only) |
| 7 | BACK DOOR | 30A | Power Boot |
| 8 | AM1 | 7.5A | Engine Switch |
| 9 | RR FOG | 10A | Rear Fog Lamp |
| 10 | P/W LH | 30A | Power Windows - LH |
| 11 | DOOR | 30A | Door Lock |
| 12 | DOME | 7.5A | Room Lights |
| 13 | TAIL | 10A | Rear Tail lights |
| 14 | PANEL | 10A | Switch illuminator, Aircon illuminator |
| 15 | ECU-IG | 10A | ABS, Power Slide Door, Cruise Control |
| 16 | RR WIP | 10A | Rear Wiper |
| 17 | A/C | 10A | Aircon, Audio |
| 18 | DEICER | 30A | Front Wiper Deicer |
| 19 | SLOPE | 7.5A | - |
| 20 | SEAT HTA | 10A | Seat Heater |
| 21 | INJ | 15A | Engine Computer |
| 22 | UGN | 10A | Engine Computer, SRS Airbag |
| 23 | MET IGN | 7.5A | Meter |
| 24 | ECU ACC | 10A | Shift lock, Door mirror, Audio |
| 25 | CIG | 15A | Cigarette Lighter |
| 26 | P/POINT | 15A | Accessory socket |
Please note that the above write up cover what I know on the fuse locations for the new facelift model of 1st generation Toyota Alphard. Other model may have different fuse locations.
PS. Phew. This is the longest time I ever took to write a post because the formatting I have do for the table HTML code outside of the blogging platform.
PPS. A reader was asking where exactly is the fuse box on the passenger side. I am away at the moment so I can only attached a schematic diagram as a reference. I will take a better picture of it location when I am back.

Subscribe to:
Posts (Atom)